
Picture this: You’re out in the great outdoors, surrounded by the beauty of nature, and you’re ready to cook up a delicious meal over a crackling campfire. And what better way to do it than with a trusty Dutch oven? In this ultimate guide, we’ll explore the exciting world of Dutch oven cooking and show you how to create mouthwatering dishes that will make your camping trip unforgettable!
Did you know that Dutch ovens have been used for centuries, dating back to the early 1700s? These versatile pots have stood the test of time and remain a favorite among outdoor enthusiasts and home cooks alike. With their ability to retain heat, distribute it evenly, and create a variety of delectable dishes, Dutch ovens are the perfect companion for your next camping adventure.
Choosing the Right Dutch Oven for Campfire Cooking
When it comes to selecting a Dutch oven for campfire cooking, there are a few key factors to consider. First, think about the size. A 12-inch or 14-inch Dutch oven is ideal for family-sized meals, providing ample space to cook for 4-6 people. Next, opt for a pre-seasoned cast iron Dutch oven. These models come ready to use and will develop a natural non-stick surface over time with proper care.
Look for a Dutch oven with legs, as this allows you to place coals beneath the pot for even heating. A flanged lid is also a must-have feature, as it enables you to place coals on top of the lid for more efficient cooking and temperature control.
Essential Tools and Accessories for Dutch Oven Cooking
To ensure a seamless and enjoyable Dutch oven cooking experience, having the right tools and accessories is crucial. Invest in a pair of long-handled tongs and a lid lifter to safely handle the hot Dutch oven and its contents. Heavy-duty gloves are also a must to protect your hands from the heat when managing coals and adjusting the pot.
A charcoal chimney starter is an invaluable tool for heating your coals efficiently and evenly. Simply fill the chimney with charcoal, light it, and wait until the coals are glowing before distributing them around and beneath your Dutch oven. A Dutch oven lid stand or tripod can also come in handy, providing a stable surface to place your hot lid while you tend to the contents of the pot.
Preparing Your Dutch Oven for Campfire Use
Before using your Dutch oven for the first time, it’s essential to properly season it. Seasoning creates a protective layer that prevents rust and helps develop a non-stick surface. To season your Dutch oven, follow these simple steps:
- Preheat your oven to 350°F (175°C).
- Wash the Dutch oven with warm, soapy water and dry it thoroughly.
- Apply a thin layer of vegetable oil or melted shortening to the entire surface, including the lid.
- Place the Dutch oven in the preheated oven for about an hour.
- Remove the Dutch oven, let it cool, and wipe away any excess oil with a clean cloth.
After each use, clean your Dutch oven with hot water and a stiff brush. Avoid using soap, as it can strip away the seasoning. Dry the Dutch oven thoroughly and apply a light coating of oil to protect it from rust during storage.
Building the Perfect Campfire for Dutch Oven Cooking
A well-built campfire is the foundation of successful Dutch oven cooking. Start by selecting a flat, clear area away from low-hanging branches and other fire hazards. If your campsite has a designated fire pit, make use of it. Otherwise, create a sturdy fire ring using rocks to contain the fire.
Hardwood logs, such as oak, hickory, or maple, are ideal for Dutch oven cooking as they burn slowly and provide consistent heat. Avoid using softwoods like pine, as they burn quickly and produce excessive smoke. Allow the fire to burn down until you have a bed of hot coals, which will provide the steady heat needed for even cooking.
Mastering the Art of Temperature Control
Controlling the temperature is key to achieving perfectly cooked meals in your Dutch oven. The “hand test” is a simple way to gauge the heat of your coals. Hold your hand about 6 inches above the coals and count how many seconds you can comfortably keep it there:
- 6-7 seconds: Low heat
- 4-5 seconds: Medium heat
- 2-3 seconds: High heat
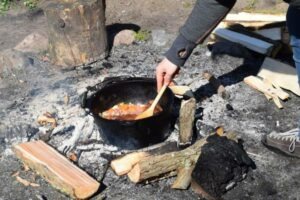
To cook with your Dutch oven, place a layer of hot coals beneath it and arrange coals on the lid. As a general rule, use twice as many coals on the lid as beneath the pot. Adjust the number of coals to achieve the desired temperature, adding more for higher heat and removing some for lower heat.
For even cooking, rotate your Dutch oven and lid 90 degrees in opposite directions every 15 minutes. This helps distribute the heat evenly and prevents hot spots that can lead to burning or uneven cooking.
Delicious Dutch Oven Recipes to Try on Your Next Camping Trip
Now that you’ve mastered the basics of Dutch oven cooking, it’s time to put your skills to the test with some mouthwatering recipes. Here are a few ideas to get you started:
- Classic Campfire Chili with Cornbread Topping Prepare a hearty chili with ground beef, beans, tomatoes, and your favorite seasonings. Pour the chili into the Dutch oven and top it with a layer of cornbread batter. Bake until the cornbread is golden and the chili is bubbly.
- Hearty Breakfast Skillet with Eggs, Potatoes, and Sausage Sauté diced potatoes, onions, and bell peppers in the Dutch oven until tender. Add sliced pre-cooked sausage and crack eggs over the top. Cover and cook until the eggs are set to your liking.
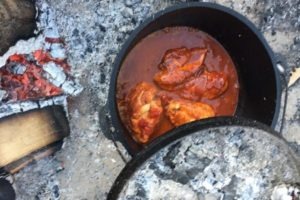
- Pulled pork is a classic and stabe in our camping slow food meal plan for camping. We love the way it can all be prepped from home and then all you need when out is time. Find our full recipe here: The best Campfire Dutch Oven Pulled Chicken Recipe
- Decadent Peach Cobbler for a Sweet Treat Under the Stars Melt butter in the Dutch oven, then add a layer of sliced fresh or canned peaches. Sprinkle with sugar and cinnamon. Pour a simple batter made from flour, sugar, baking powder, and milk over the peaches. Bake until the cobbler is golden brown and bubbling.
Conclusion
Cooking with a Dutch oven over a campfire is an art form that combines the beauty of nature with the joy of creating delicious meals. By following the tips and techniques outlined in this guide, you’ll be well on your way to becoming a Dutch oven master. So, gather your ingredients, build that perfect fire, and let your taste buds embark on an unforgettable culinary adventure. Happy camping and bon appétit!
Ready to take your campfire cooking skills to the next level? Grab your Dutch oven, head out into nature, and start experimenting with these incredible recipes. Share your successes (and learning experiences) with fellow outdoor enthusiasts, and let’s inspire each other to create more delicious meals under the open sky!


That sounds amazing! Best of luck with it!
We are having a dutch oven cooking contest at our next girls campout. I would like to bake bread in…
Thank you, Much appreciated (And I may have gotten that word wrong, but the feeling is true :-) ) Have…